![]() Owncloud is a popular file storage and synchronization system, with many additional features available for it. It’s a self-hosted alternative to systems like dropbox, but with owncloud your files are stored on your own servers. This allows you to meet requirements to keep data in a certain jurisdiction, for example, or it might give you peace of mind to know where your data is stored and who has access to it.
Owncloud is a popular file storage and synchronization system, with many additional features available for it. It’s a self-hosted alternative to systems like dropbox, but with owncloud your files are stored on your own servers. This allows you to meet requirements to keep data in a certain jurisdiction, for example, or it might give you peace of mind to know where your data is stored and who has access to it.
Running owncloud means you can keep documents organized in the owncloud repository and have access to them from anywhere, including desktop computers, laptops, mobile devices, and even through the web on public computers. Changes made to those documents will be synchronized so the changes will show up on the other devices automatically.
You can use it as a personal server with a single account or it can be used as an organization’s file store with multiple accounts. Users can be assigned to groups, and different groups can have access to different sets of files. You can also share files with someone outside your organization who doesn’t have an account on owncloud by sending them a special link they can use to access the file.
There are also a number of plugins that can be loaded to enable other functionality; for example you can synchronize calendars and addressbooks between your devices using owncloud.
In this document, I’ll explain how to get a recent version of Owncloud running on a new RimuHosting Debian VPS.
I’ll assume you already have a website and associated domain name. I’m going to use alexking.nz as my domain name here. Wherever you see that in instructions here, replace it with your own domain name. Owncloud will need to have a dns name configured to be accessible. It’s possible to have it in a subdirectory of your main site, e.g. https://www.alexking.nz/owncloud, but I’m going to set it up as a separate sub-domain, i.e. https://owncloud.alexking.nz/
Create a VPS
To get a new VPS to host Owncloud, go to https://rimuhosting.com/order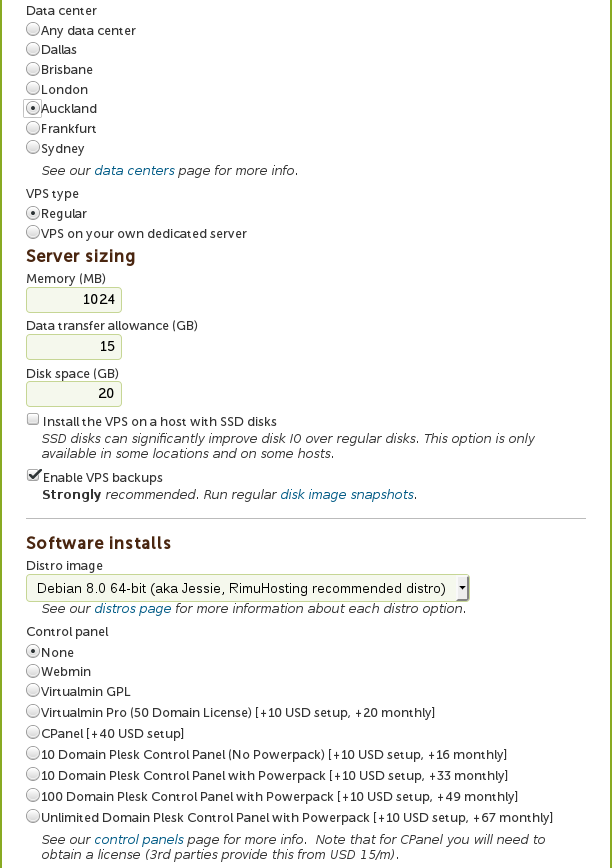 /v2orderstart.jsp. Get started by selecting the budget VPS, and configure the resources from there. Name it after the domain name you will use (this could be changed later if necessary.) You can see I have selected to host my server in Auckland, with 1024MB of RAM (which should be sufficient for a small to medium load owncloud server), and 20GB of disk space. You should adjust the disk space to cover the file storage size you think you will need. Keep in mind that this disk size can easily be increased later via your control panel, if needed. The other settings can be left on their defaults.
Set up DNS
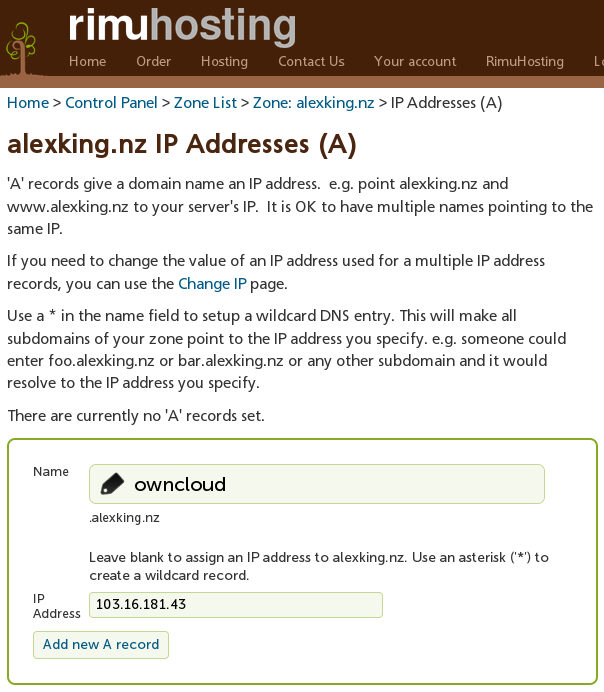 Once the VPS is set up, you will get a welcome email listing the “Primary IP”. Use this to set up DNS to point the domain subdomain you selected to the owncloud server. In this case I’ve logged in to my RimuHosting control panel, and under “Manage your DNS,” I set an “A” record, owncloud.alexking.nz to point to 103.16.181.43. That is the IP address from the welcome email. If your DNS is with a different provider, you will need to arrange for that record to be entered into their system. Test the DNS record by opening a terminal or command prompt and typing “ping owncloud.alexking.nz” (replacing owncloud.alexking.nz with the DNS name you just set up.) If your DNS is with RimuHosting, the ping should work immediately. If it is with another provider, it might take up to 30 minutes or more to become available. If you have trouble with this step, you could log in to RimuHosting’s Live chat and ask for assistance.
Log in and load the Owncloud software
Log in to your server as root, using ssh. You could do that from https://rimuhosting.com/cp/vps/index.jsp, where you select the “SSH To VPS” link. However, I found I could not cut and paste into the ssh session if I did it that way, and typing in the following commands manually could be tedious. Instead, use ssh software like putty for windows, or plan ssh in the terminal on Mac or Linux. Once you are logged in with ssh, use the following commands to load owncloud from the owncloud repository:
wget -nv https://download.owncloud.org/download/repositories/stable/Debian_8.0/Release.key -O Release.key
apt-key add Release.key
echo 'deb http://download.owncloud.org/download/repositories/stable/Debian_8.0/ /' >> /etc/apt/sources.list.d/owncloud.list
apt-get update
apt-get -y install postfix owncloud
Note we are asking for the postfix email server to be installed in addition to owncloud. The command will also load a host of other supporting software including the Apache webserver and MySQL datbase server. The download will take a minute or so.
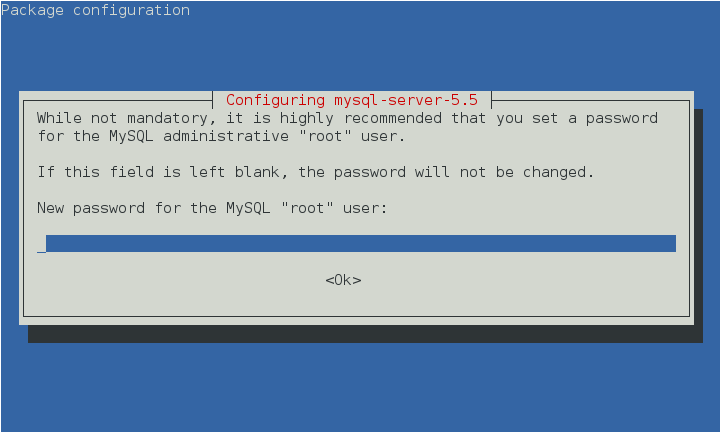 During the install, you are asked to set a mysql root password. You should set a password here. The installer will also ask about Postfix Configuration, select the default “Internet Site” configuration, and use the domain name you have created for owncloud (this is the domain the installer will most likely suggest to use.)
Create a database for Owncloud to use
Next we’ll set up a MySQL database for owncloud to use. In the SSH window, enter the following commands, replacing password with the password you selected above:
echo "CREATE USER 'owncloud'@'localhost' IDENTIFIED BY 'password';
CREATE DATABASE IF NOT EXISTS owncloud;
GRANT ALL PRIVILEGES ON owncloud.* TO 'owncloud'@'localhost'"|
mysql -uroot -p
You will be prompted for the password again once you have entered those lines, enter the mysql password you set above.
Enable SSL secure connections
At this stage, owncloud is partially installed and running at http://owncloud.alexking.nz/owncloud. But I want it at the root of the domain, and I want the site to be secured via https. To do that, I need to generate a site certificate, and change the webserver config. I’ll use the convenient RimuHosting script explained at https://rimuhosting.com/howto/modssl.jsp to configure a certificate. In your ssh window, use the following commands:
wget -q -O ./prepcert.sh http://proj.rimuhosting.com/prepcert.sh
bash ./prepcert.sh
You then need to provide the script with information about the server and certificate. This information is used to put in the certificate if you use a self signed certificate, or if you decide to get a commercial certificate much of it won’t be used. The important parts are the certificate name and Common Name, which must match your domain:
Will this be a wildcard SSL certificate? (y/n or Ctrl-C to exit) n

What is the domain name that you want the SSL certificate to cover. This will be used for the certificate *file* name.
Enter the certificate name : owncloud.alexking.nz
...
Country Name (2 letter code) [AU]:NZ
State or Province Name (full name) [Some-State]:Otago
Locality Name (eg, city) []:Dunedin
Organization Name (eg, company) [Internet Widgits Pty Ltd]:Alexs file sharing
Organizational Unit Name (eg, section) []:
Common Name (e.g. server FQDN or YOUR name) []:owncloud.alexking.nz
Email Address []:myemail@alexking.nz

Please enter the following 'extra' attributes
to be sent with your certificate request
A challenge password []:
An optional company name []:

Generating a new self-signed certificate...
Now you have a self signed certificate, stored in a file as indicated by the script. (If you want a commercial certificate for that, put in an SSL Cert ticket at https://rimuhosting.com/ticket/startticket.jsp, and note that you already created a CSR with prepcert.sh. A commercial certificate will avoid security warning messages in browsers and other clients, and it is appropriate when you want to share files with more than a couple of friends.)
Next get the apache on your VPS to serve owncloud by default, and enable an SSL site as well, using the key we just created:
sed -i.bak 's,www/html,www/owncloud,' /etc/apache2/sites-available/000-default.conf
sed -i.bak 's,www/html,www/owncloud,' /etc/apache2/sites-available/default-ssl.conf
. /root/sslorderdetails
shortkey=${keyfile:0:-14}
sed -i "s,/etc/ssl/private/ssl-cert-snakeoil.key,$shortkey," /etc/apache2/sites-available/default-ssl.conf
sed -i "s,/etc/ssl/certs/ssl-cert-snakeoil.pem,${shortkey//key/crt}," /etc/apache2/sites-available/default-ssl.conf
a2ensite default-ssl
a2enmod ssl
service apache2 restart
Connect the database
Now Owncloud is running at your url (https://owncloud.alexking.nz/ in my case.) Connect to that with your web browser, accept the self-signed 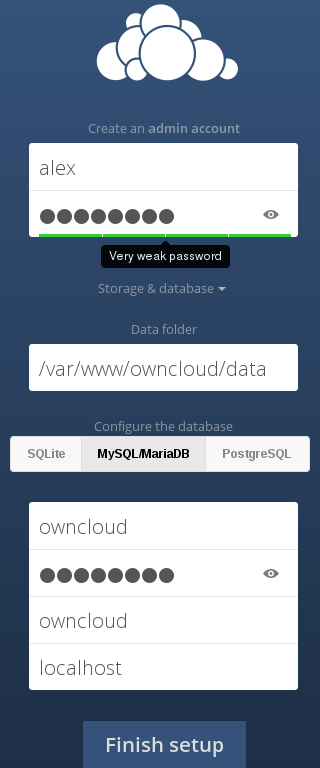 certificate, and you will see the owncloud setup screen with a warning about SQLite.
We want to use MySQL instead of SQLite, so click the “Storage & Datebase” dropdown, and select “MySQL/MariaDB”. This will reveal 4 fields which need to be filled in.
In the “Database User” field, enter “owncloud”. In the “Database password” field, enter the password you created above. In the “database name” field, enter “owncloud” again. The final field can be left at “localhost.”
At the top, you should fill in a username and password for someone who is going to be the administrator of owncloud. Your own name is a good choice for the username if you will be taking care of it, or your organisation name if that role will be shared around. Select a secure password for this role. (note I got a warning saying Very weak password, but I think this is a bug. As long as you get a full green line in the password field you should be ok.)
Click “Finish setup.”
Ready to go
Owncloud setup should take less than a minute, and you will be taken to the welcome screen.
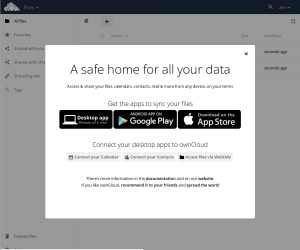 You can explore the links to client applications on the welcome screen, or close that and start working with the web interface.
Set up email
There are a few post install setup tasks that should be done at this stage. First, under your username dropdown menu in the top right, select “Personal”. This takes you to your profile, where you can set your email address. This is used if your password ever needs to be reset.
Next go to the “Admin” menu, and select email server. The send mode can be left as is, but you will need to fill in an email “from” address there for the system to be able to send out email notifications. You can most likely use the same email address there if you want to.
You owncloud server should now be completely set up and ready to use. If you encounterd any problems while installing owncloud on a Rimu VPS you can get help by connecting to live chat or lodging a support ticket.