 The latest Ubuntu LTS release, Xenial 16.04 , comes with support for a container system called LXD. LXD builds on the existing LXC container system, allowing for more convenient management of those containers.
In this post I show how you can test out LXD containers on a Rimu VPS running Ubuntu 16.04. I assume you already have a Ubuntu 16.04 VPS set up; if not you can grab one at RimuHosting or launchtimevps.com.
Containers allow further separation between websites running on your VPS, which can be useful for removing dependency problems, for creating test environments for upgrading or developing new sites and perhaps for improving the security of your websites.
Linux Containers
So what are containers? They are a way to separate a server into several virtual or sub-servers so that different tasks can run isolated in the same server. Docker is a popular container system that focuses on running a single daemon in each container. LXD uses similar technology to deliver an entire Linux OS in its containers, so the containers each look like a separate system.
You can read more about LXD at https://www.stgraber.org/2016/03/11/lxd-2-0-introduction-to-lxd-112/
Why would I want containers? They allow you to run several separated environments within one VPS without using a separate VPS for each one. Note that if you have high traffic sites then it may be better to have a separate VPS for each or even a dedicated server, but there is no reason why a single VPS can’t serve many smaller sites.
Separating the sites into different environments can be useful because you might need to run an older version of PHP for some sites and a more modern one for others, or you might want CentOS for one and Debian for another, or you might want to test an upgrade or develop a new site while leaving the originals untouched. In these cases LXD containers could be useful.
Enable Btrfs filesystem
Each container system you create requires its own filesystem. That can be just a subdirectory of the main filesystem, but that is quite inefficient and does not let you take full advantage of LXD features. Using btrfs, a next generation linux filesystem, will use less space and allow quicker disk access in your containers.
To enable btrfs is a slightly involved operation, and should probably be done on a new VPS to avoid disrupting any existing sites. (Note anything happening on the VPS from now until the btrfs conversion and reboot is complete will not be retained on the new system, so make sure no production services such as email and databases are running on your VPS.)
First take a backup at https://rimuhosting.com/cp/vps/backup.jsp – the data in this backup won’t actually be used but the backup file itself is where we create the new btrfs. Next go to https://rimuhosting.com/cp/vps/disk/mount.jsp to connect that backup you just created (check the labels for the most recent VPS manual backup, select that, and “Save Changes And Reboot”)
Now log in to your VPS over SSH. Run the following commands to create the btrfs:
mkfs.btrfs -f /dev/xvda3
mount -t btrfs /dev/xvda3 /mnt/
apt-get clean
cd mnt/
tar c --one-file-system / |tar xv
The last command takes a while and copies all the files from your root filesystem to the new btrfs.
Now edit the file /mnt/etc/fstab, and replace “ext4” with “btrfs”, and add the option “user_subvol_rm_allowed”. Your fstab will end up looking like this:
/dev/xvda1 / btrfs defaults,user_subvol_rm_allowed,noatime 1 1
/dev/xvda9 swap swap defaults 0 0
Your new btrfs filesystem is ready. To use that, go to https://rimuhosting.com/cp/vps/disk/restore.jsp. Select the correct backup (the one you just created, note times are in UTC) and click Restore. The system will reboot, using the filesystem you just created.
Enable LXD
After the reboot, log in to your VPS over ssh again. Enable lxd with the “lxd init” command. The initialization process will ask some questions, you can accept the defaults for most of those.
Name of the storage backend to use (dir or zfs): dir
Would you like LXD to be available over the network (yes/no)? no
Do you want to configure the LXD bridge (yes/no)? yes
The process sets up a network bridge, private IPv4 and IPv6 networks, and turns on NAT so the containers can access the internet, if you accept the default answers to the networking questions.
Create your first LXD container
You can see a list of which Linux distributions are available in LXD using the image list command:
lxc image list images:
I want a debian jessie image, so create the container with:
lxc launch images:debian/jessie/amd64 myfirstcontainer
My container is now running, I can see that with:
lxc list
Getty fixup
Because of a shortcoming of systemd in current distributions we need to disable and “mask” gettys, so systemd will not try to run them on non-existent consoles. Using lxc exec to get a bash prompt in the container:
# lxc exec myfirstcontainer bash
root@myfirstcontainer:~# systemctl disable console-getty.service
root@myfirstcontainer:~# systemctl disable getty@tty1.service
root@myfirstcontainer:~# systemctl disable getty@tty2.service
root@myfirstcontainer:~# systemctl disable getty@tty3.service
root@myfirstcontainer:~# systemctl disable getty@tty4.service
root@myfirstcontainer:~# systemctl mask console-getty.service
root@myfirstcontainer:~# systemctl mask getty@tty1.service
root@myfirstcontainer:~# systemctl mask getty@tty2.service
root@myfirstcontainer:~# systemctl mask getty@tty3.service
root@myfirstcontainer:~# systemctl mask getty@tty4.service
root@myfirstcontainer:~# exit
exit
#
Setting up ssh
I’d like to administer the container using ssh. However, the ssh daemon is not installed yet. We again get a bash prompt in the container context using the lxc exec command, and use that to install ssh.
# lxc exec myfirstcontainer bash
root@myfirstcontainer:~# apt-get update
Get:1 http://security.debian.org jessie/updates InRelease [63.1 kB]
Ign http://httpredir.debian.org jessie InRelease
Get:2 http://security.debian.org jessie/updates/main amd64 Packages [283 kB]
Hit http://httpredir.debian.org jessie Release.gpg
Hit http://httpredir.debian.org jessie Release
Get:3 http://security.debian.org jessie/updates/main Translation-en [143 kB]
Get:4 http://httpredir.debian.org jessie/main amd64 Packages [6761 kB]
Get:5 http://httpredir.debian.org jessie/main Translation-en [4580 kB]
Fetched 11.8 MB in 11s (1022 kB/s)
Reading package lists... Done
root@myfirstcontainer:~# apt-get install openssh-server
Reading package lists... Done
Building dependency tree
Reading state information... Done
The following extra packages will be installed:
 libx11-6 libx11-data libxau6 libxcb1 libxdmcp6 libxext6 libxmuu1
 ncurses-term xauth
Suggested packages:
 ssh-askpass rssh molly-guard ufw monkeysphere
The following NEW packages will be installed:
 libx11-6 libx11-data libxau6 libxcb1 libxdmcp6 libxext6 libxmuu1
 ncurses-term openssh-server xauth
0 upgraded, 10 newly installed, 0 to remove and 0 not upgraded.
Need to get 1511 kB/1842 kB of archives.
After this operation, 6894 kB of additional disk space will be used.
Do you want to continue? [Y/n] y
Get:1 http://httpredir.debian.org/debian/ jessie/main libxau6 amd64 1:1.0.8-1 [20.7 kB]
...
Setting up xauth (1:1.0.9-1) ...
Processing triggers for libc-bin (2.19-18+deb8u4) ...
Processing triggers for systemd (215-17+deb8u4) ...

root@myfirstcontainer:~# exit
exit
#
The next step is to create an ssh key I can use to ssh to the container, and install the public key on the container:
# ssh-keygen
Generating public/private rsa key pair.
Enter file in which to save the key (/root/.ssh/id_rsa):
Enter passphrase (empty for no passphrase):
Enter same passphrase again:
Your identification has been saved in /root/.ssh/id_rsa.
Your public key has been saved in /root/.ssh/id_rsa.pub.
The key fingerprint is:
...
# lxc file push .ssh/id_rsa.pub myfirstcontainer/root/
# lxc exec myfirstcontainer bash
root@myfirstcontainer:~# mkdir .ssh
root@myfirstcontainer:~# mv id_rsa.pub .ssh/authorized_keys
root@myfirstcontainer:~# chmod 600 .ssh/authorized_keys

root@myfirstcontainer:~# exit
exit
#
Now I can ssh to the container. I use lxc list to find the information I need for that (IP address):
lxc list
...
| myfirstcontainer | RUNNING | 10.181.1.114 (eth0)...
# ssh 10.181.1.114

The programs included with the Debian GNU/Linux system are free software;
the exact distribution terms for each program are described in the
individual files in /usr/share/doc/*/copyright.

Debian GNU/Linux comes with ABSOLUTELY NO WARRANTY, to the extent
permitted by applicable law.
Last login: Fri Jul 15 00:38:10 2016 from 10.181.1.1
root@myfirstcontainer:~#
Success! I now have a container running which I can ssh into for maintenance. The container is running on a private IP address, which means I can’t access it directly from the internet. If I want to ssh to the container, for example, I have to first ssh to the main VPS machine and then ssh from there to my container. Likewise, if I want to run a website on the container, viewing the website would involve the browser going to the IP address of the main VPS which would then somehow have to forward the request to the container.
Ssh directly to the container
I want to be able to ssh directly from my workstation to the container, so to do that I’m going to forward a port on my VPS (port 2222) to port 22 on the container, the ssh port there:
# lxc list
+------------------+---------+---------------------+-----------------------------------------------+------------+-----------+
| NAME | STATE | IPV4 | IPV6 | TYPE | SNAPSHOTS |
+------------------+---------+---------------------+-----------------------------------------------+------------+-----------+
| myfirstcontainer | RUNNING | 10.181.1.114 (eth0) | fde9:44f0:16db:599c:216:3eff:fe42:40ae (eth0) | PERSISTENT | 0 |
+------------------+---------+---------------------+-----------------------------------------------+------------+-----------+
# iptables --table nat --append PREROUTING --in-interface eth0 --protocol tcp --dport 2222 --jump DNAT --to-destination 10.181.1.114:22
# iptables-save
# Generated by iptables-save v1.6.0 on Fri Jul 15 01:01:12 2016
...
COMMIT
# Completed on Fri Jul 15 01:01:12 2016
#
Now I can directly ssh from my workstation to the container (although I have to copy my ssh private key to my workstation first, or install a public key from my workstation in to authorized_hosts on the container):
workstation $ ssh -oHostKeyAlias=myfirstcontainer -p2222 root@103.16.181.43

The programs included with the Debian GNU/Linux system are free software;
the exact distribution terms for each program are described in the
individual files in /usr/share/doc/*/copyright.

Debian GNU/Linux comes with ABSOLUTELY NO WARRANTY, to the extent
permitted by applicable law.
Last login: Fri Jul 15 00:39:39 2016 from 10.181.1.1
root@myfirstcontainer:~#
The -oHostKeyAlias=myfirstcontainer option to ssh gives a name to the container so it does not get the ssh identity of the container confused with that of the main vps, or other containers that might be running there. 103.16.181.43 is the ip address of my VPS, use the ip address of your own VPS there.
I can make ssh to the container easier, by creating an ssh configuration on my workstation (in .ssh/config) like this:
Host mfc
 Hostname 103.16.181.43
 Port 2222
 User root
 HostKeyAlias myfirstcontainer
Now I can ssh to the container with a simple “ssh mfc”. Saves a lot of typing.
Setting up a website on the container
I’m going to install a webserver in the container.
workstation $ssh myfirstcontainer
root@myfirstcontainer:~# apt-get install apache2
Reading package lists... Done

...

Processing triggers for sgml-base (1.26+nmu4) ...
root@myfirstcontainer:~#
A webserver is now installed and running. But we can’t access it from the internet. To do that, we need something to route the traffic from the main VPS to the container. Like we did with ssh, we can use iptables for that (from the main vps):
# lxc list
+------------------+---------+---------------------+-----------------------------------------------+------------+-----------+
| NAME | STATE | IPV4 | IPV6 | TYPE | SNAPSHOTS |
+------------------+---------+---------------------+-----------------------------------------------+------------+-----------+
| myfirstcontainer | RUNNING | 10.181.1.114 (eth0) | fde9:44f0:16db:599c:216:3eff:fe42:40ae (eth0) | PERSISTENT | 0 |
+------------------+---------+---------------------+-----------------------------------------------+------------+-----------+
# iptables --table nat --append PREROUTING --in-interface eth0 --protocol tcp --dport 8888 --jump DNAT --to-destination 10.181.1.114:80
# iptables-save
# Generated by iptables-save v1.6.0 on Fri Jul 15 02:49:33 2016
...
COMMIT
# Completed on Fri Jul 15 02:49:33 2016
#
Now we can access our new website at http://103.16.181.43:8888/.
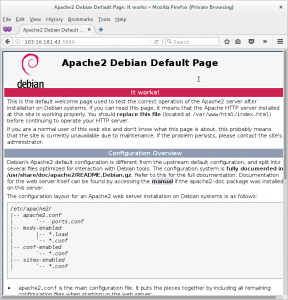
That works OK, but having the port number tacked on the end of the host part of the url can look ugly, and on some networks that would be blocked, so it won’t work for everyone. To use such a system in production, you would most likely want to use apache, nginx or some other software to proxy requests from the main port of your VPS so each different site served can potentially go to a different container.
I’m going to do that with the apache that’s already running on my main VPS. I need a domain name that I can point at my VPS IP. In this case I’m using myfirstcontainer.com, but you might use a test hostname set up on your domain. You can set that up in your DNS, say through https://zonomi.com/. The name you choose should point to the IP address of your VPS. (103.16.181.43 in my case) You would then follow what I am doing but replace myfirstcontainer.com with your own domain name, and 10.181.1.114 with the ip address of your container you get from the “lxc list” command. So on the main vps:
# echo '<VirtualHost *:80>
ServerName myfirstcontainer.com
ProxyPass "/" "http://10.181.1.114/"
ProxyPassReverse "/" "http://10.181.1.114/"
ErrorLog ${APACHE_LOG_DIR}/error.log
CustomLog ${APACHE_LOG_DIR}/access.log combined
</VirtualHost>' > /etc/apache2/sites-available/myfirstcontainer.com.conf

# a2enmod proxy_http
# a2ensite myfirstcontainer.com
# service apache2 reload
Now you can access the site running in the container from the internet, using the default port, by browsing to http://myfirstcontainer.com/.
What next
Containers can allow you to separate multiple websites on a single VPS even more than using separate directories and webserver virtual hosts, which is the common way to host multiple sites on a single server. That can give some added security. It also allows different php versions, different distributions versions and even different distributions entirely to be used for different sites. You might use it to develop and test new sites, or to test the upgrade of existing sites. You might use it to run a site that requires a recent distro alongside a site based on an older distro that you can’t upgrade yet.
I showed how to use apache as a web proxy to forward http requests to the container. Although I did not show it, the same method can be used to send https requests to the container, so you can also run secure websites in containers.
If you think you could benefit from using containers but don’t want to spend the time to set it all up yourself, you can put in a sysadmin support ticket, and we can set that up for you. Just remember you need a Ubuntu 16.04 VPS which will need to be restarted during the process. If you are not sure whether this will meet your needs, we are happy to advise. Just put in a ticket describing your situation, at https://rimuhosting.com/ticket/startticket.jsp