In this post I’m going to introduce playbooks, and show you how to customise the /etc/resolv.conf file on each server. I assume you have followed Part One of this series and have created a hosts file and files in ~/myansible/host_vars/.
Tasks, playbooks, groups and roles
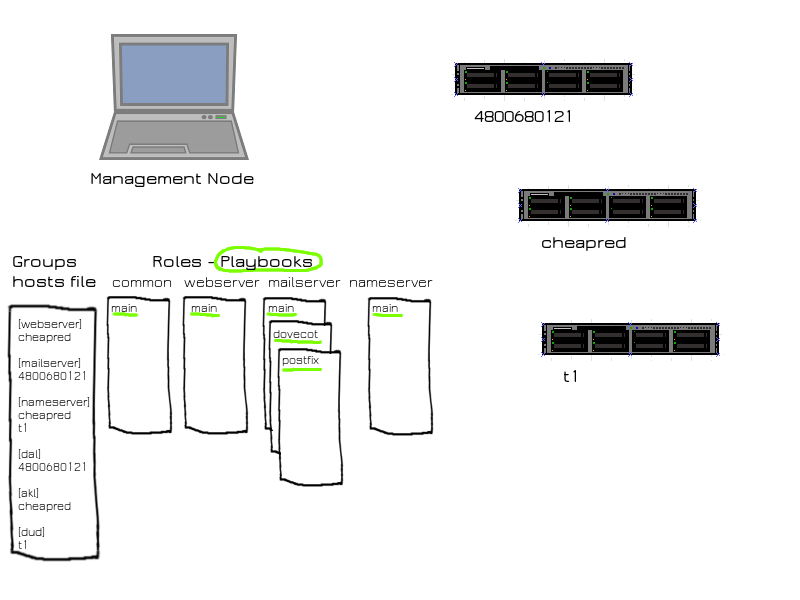
 A note on terminology. A task is something done on a server, like a file created or updated, a user, cron job, or os package added or removed etc. A task could be done from the command line using the ansible binary, but usually multiple tasks get grouped together in a yaml file called a playbook. A playbook might install and configure one specific piece of software, for example. The image above shows a set of 6 playbooks, each which will have multiple tasks within it (the tasks are not shown)
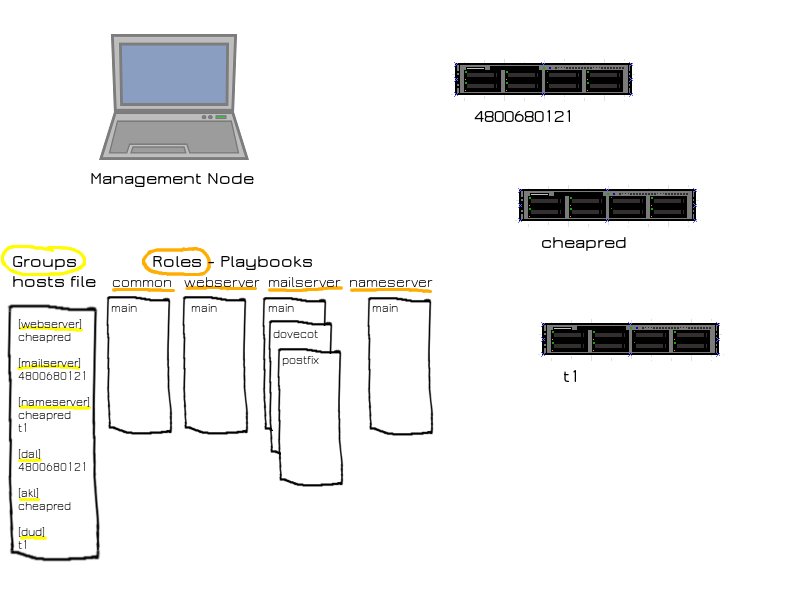
 Groups are servers with common characteristics such as location, operating system, and function. Roles are a set of playbooks handled together as a unit.
Usually there is one to one correspondence between groups and roles. So there might be a webserver group, which contains all the hosts that are going to be webservers. Then there is a webserver role, a set of playbooks to apply to to webservers, which in turn carry out a series of tasks to set up the webserver on a host.
In the image above, there are six groups, highlighted in yellow, and four roles, highlighted in orange. Three of the groups, webserver, mailserver and nameserver correspond to three of the roles. Another three (dal, akl and dud) are location groups. There is also always a group called “all”, which holds every server listed in the hosts file, including ones defined outside of other groups.
We already saw the hosts file, which was created in Part One. Next I’ll show you how to create create the “common” role.
Some common tasks
Now that ansible knows which servers exist and we understand a little about how ansible is organised, we’re ready to start using it to do some server configuration.
I’d like to make sure all my servers have a sane /etc/resolv.conf so DNS lookups work well. So I create a role for that:
cd ~/myansible
mkdir -p roles/common/tasks
and create a playbook that links all servers to the common role:
# common.yml: run the common role for all servers
---
- hosts: all
  sudo: yes
  roles:
    - common
This file lives in the root of your amsible configuration, ~/myansible
The “sudo: yes” means superuser permissions are needed, so if not connecting as root, use sudo to gain permissions. This eliminates the need to type “–sudo” on every ansible command line. But it’s also not needed if you ssh as root everywhere. Now I create the playbook that will create or update resolv.conf file on each server:
# roles/common/tasks/main.yml: master playbook for the common role
---
- name: create /etc/resolv.conf to configure DNS resolution
  template: src=resolv.conf.j2 dest=/etc/resolv.conf
Template files
This playbook has a single task. The task has a name, which will be printed as the task executes, and the “template” refers to the ansible module that will be executed to perform the task. The template module creates a file on the destination system using a Jinja2 template. Templates for the common role are stored in roles/common/templates:
mkdir -p roles/common/templates
The template should look like this:
{# Store this file in roles/common/templates/resolv.conf.j2 #}
# resolv.conf(5) file for glibc resolver(3) generated by ansible
search king.net.nz
{% if 'nameserver' in group_names %}
nameserver ::1
{% endif %}
{% for ip in nameserver_ips %}
nameserver {{ ip }}
{% endfor %}
nameserver 8.8.8.8
This template shows a few features. Firstly, comments in Jinja 2 are delimited by {# and #}. They won’t appear in the file created on the target server. Second, conditionals and loops are created with {% %} blocks, with {% if %} {% endif %} and {% for %} {% endfor %}. Finally, {{ }} blocks mark variable substitution.
The template checks if the server being processed is in the “nameserver” group, which are servers running DNS software, and if so it puts a “nameserver ::1” entry in the file so localhost is first dns server consulted.
Then it loops over a list of DNS servers in the nameserver_ips variable with a for loops, putting a nameserver entry in for each one. But where does that nameserver_ips variable come from? That hasn’t been created yet. Variables can come from host_vars, or in this case group_vars.
Variables and group_vars
We saw host_vars in part one, where it was used to specify variables for each individual server, hostname and port for ssh in that case. We could put the nameserver_ips variable in there to specify DNS servers for each host. But since all the servers in a location will use the same DNS servers, it makes more sense to specify them in a group_vars file specific to the location. First make a directory for group_vars:
mkdir group_vars
Now create the location files:
# group_vars/dal: Variables for servers in Dallas
---
# DNS servers to use
nameserver_ips:
  - 72.249.191.254
  - 206.123.113.254
  - 66.199.228.254
# group_vars/akl: Variables for servers in Auckland
---
# DNS servers to use
nameserver_ips:
  - 103.16.180.254
# group_vars/dud: Variables for servers in Dunedin
---
# DNS servers to use
nameserver_ips:
  - 202.36.170.2
  - 202.36.170.5
Testing it out
Now we have everything ansible needs to configure /etc/resolv.conf on those machines. Let’s test it out. To run a playbook, you use the “ansible-playbook” command, and the –check option will run a test without actually changing anything on the target machines, and –diff will show you a diff of files on the target machines (–ask-sudo-pass will prompt me for my sudo password, since I connect as a regular user to t1. If you connect as root to all servers, you don’t need that option):
ansible-playbook --ask-sudo-pass --check --diff common.yml
sudo password:

PLAY [all] ********************************************************************

GATHERING FACTS ***************************************************************

ok: [t1]

ok: [4800680121]

ok: [cheapred]

TASK: [common | create /etc/resolv.conf to configure DNS resolution] **********
--- before: /etc/resolv.conf
+++ after: /home/alex/myansible/roles/common/templates/resolv.conf.j2
@@ -1,6 +1,6 @@
 # resolv.conf(5) file for glibc resolver(3) generated by ansible
+search king.net.nz
 nameserver ::1
 nameserver 202.36.170.2
 nameserver 202.36.170.5
-domain king.net.nz
-search king.net.nz
+nameserver 8.8.8.8

changed: [t1]
--- before: /etc/resolv.conf
+++ after: /home/alex/myansible/roles/common/templates/resolv.conf.j2
@@ -1,6 +1,5 @@
 # resolv.conf(5) file for glibc resolver(3) generated by ansible
+search king.net.nz
 nameserver ::1
 nameserver 103.16.180.254
-domain king.net.nz
-search king.net.nz
-
+nameserver 8.8.8.8

changed: [cheapred]
--- before: /etc/resolv.conf
+++ after: /home/alex/myansible/roles/common/templates/resolv.conf.j2
@@ -1,6 +1,6 @@
-search ansible.alexking.nz
+# resolv.conf(5) file for glibc resolver(3) generated by ansible
+search king.net.nz
 nameserver 72.249.191.254
 nameserver 206.123.113.254
-#nameserver 66.199.228.254
 nameserver 66.199.228.254
-
+nameserver 8.8.8.8

changed: [4800680121]

PLAY RECAP ********************************************************************
4800680121             : ok=2 changed=1 unreachable=0 failed=0
cheapred               : ok=2 changed=1 unreachable=0 failed=0
t1                     : ok=2 changed=1 unreachable=0 failed=0
There is quite a bit happening here. After asking for my sudo password, ansible starts the section GATHERING FACTS. It logs into each server, and using the setup module, gathers facts about each server into some special variables. That was mentioned in Part One.
That reports OK from each machine. Next it starts its first task:
TASK: [common | create /etc/resolv.conf to configure DNS resolution]
It shows a diff for each /etc/resolv.conf. For t1, it moves the search line from the bottom of the file to the top, removes the domain line, and adds google as a backup. The others are similar, the changes are minor and cosmetic. The playbook looks good to go.
Finally, under PLAY RECAP, I get a summary of what would have happened, had this not been a dry run. It’s showing for each server, 2 tasks were run and one of them changed something on the server.
Running it for real
Now that I’m comfortable with with the changes for /etc/resolv.conf, I can run that command to actually make the changes, by removing –check (and also –diff, because I don’t need to see the changes again.)
ansible-playbook --ask-sudo-pass common.yml
sudo password:

PLAY [all] ********************************************************************

GATHERING FACTS ***************************************************************
ok: [cheapred]
ok: [t1]
ok: [4800680121]

TASK: [common | create /etc/resolv.conf to configure DNS resolution] **********
changed: [t1]
changed: [cheapred]
changed: [4800680121]

PLAY RECAP ********************************************************************
4800680121             : ok=2 changed=1 unreachable=0 failed=0
cheapred               : ok=2 changed=1 unreachable=0 failed=0
t1                     : ok=2 changed=1 unreachable=0 failed=0
The end result is to make sure I have a consistent /etc/resov.conf on 3 servers. I created 10 files including ansible playbooks, other yaml configuration files and jinja2 templates. That is a bit of work, but it has advantages over manual configuration.
If I add another server, I don’t need to remember to check /etc/resolv.conf, I simply add the machine to ansible and run a playbook that covers my typical set-up tasks, and that will get taken care of.
If I decide I want to take the google fallback DNS server out of all my /etc/resolv.conf files or make a different change, I can simply edit the template file once, and run ansible to push that change out to all my servers. Likewise, the specification of the DNS servers to use at each location is kept in a single place.
If DNS lookup stops working, and I suspect /etc/resolv.conf got changed somehow, I can run ansible in check mode to see if the file was changed by something else, and to give me a diff against the expected configuration.
The file layout I have chosen is more complex than necessary for this task (I could probably have gotten away with three files: hosts, a playbook and a template.) The reason for that is to create an extensible layout that lends itself to adding extra roles and locations. If I create a playbook for each task I would do when setting up a server, that means my server set-up can be fully automated. I can then re-install existing servers, or set up new servers, or reinstall from scratch on a new OS in minutes, despite those perhaps needing complex configuration.
Next steps
Here are some things I could do to improve this simple task:
- Check for the resolvconf package. If that’s installed, /etc/resolv.conf is created dynamically at runtime from configuration information held elsewhere. If that’s the case, I could either remove the resolvconf package altogether or put configuration data in /etc/network/interfaces where resolvconf expects to find it.
- Extend the configuration to cover DNS servers. If I’m running a DNS server as a resolver on some of the machines, I can use the the upstream DNS information held in my location group_vars to configure DNS forwarders for my DNS servers.
- Install further roles, e.g. webserver, mailserver etc.
- Put the ansible directory into version control and share it with others who are administering the same servers.
In the next part, I’ll show how to use this to set up a mailserver.
I’ve found the great advantage of ansible is to keep configuration consistent across servers, so when I fix a problem on one server, I can easily roll out the fix to all servers. If you manage multiple servers, you can take advantage of this too. As always, if you think you would benefit from this but you need some assistance to get started, pop in a sysadmin ticket at https://rimuhosting.com/ticket/startticket.jsp and we can set up an ansible infrastructure for you.
