
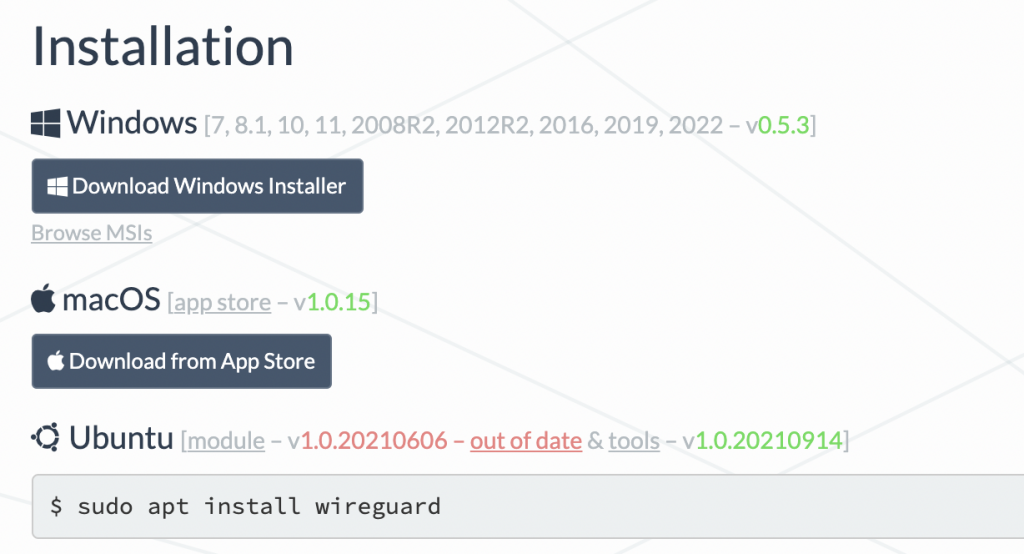
Wireguard is a modern, easy to setup, VPN. It has clients for Windows, Mac, Linux, iPhone, Android, and other OSes.
In this post we are following the guide at https://serversideup.net/how-to-set-up-wireguard-vpn-server-on-ubuntu-20-04/
First, Order a VM. This will be the ‘server’ for the VPN.
You don’t need a lot of memory or disk to run a VPN server. Choose a location for the VM appropriate to your needs. In the sample order link we are using a Debian 11 image.
On your new Linux server, install wireguard, iptables, and ufw.
root@au:~# sudo apt-get install wireguard iptables ufw qrencode
Reading package lists... Done
Building dependency tree... Done
Reading state information... Done
The following additional packages will be installed:
  apparmor busybox firmware-linux-free initramfs-tools initramfs-tools-core klibc-utils libklibc linux-base
  linux-image-5.10.0-11-rt-amd64 linux-image-rt-amd64 pigz wireguard-tools
You may get an kernel/initramfs error like ‘update-initramfs: Generating /boot/initrd.img-5.10.0-11-rt-amd64’ This is safe to ignore if your VM boots from a host provided kernel.
If you are using a RimuHosting provided kernel, ensure (via uname -a) you are on a 5.10 kernel or newer. Debian 11 installs will use a new kernel.
Now you can proceed with configuring your wireguard server. You can copy/paste the below as a script (eg vpn.sh) as root, then run it with ‘bash vpn.sh’ to configure the basic setup.
Note: Make sure you have a newer kernel
#!/bin/bash
# install wireguard
apt-get -y install wireguard iptables

# Create the key
mkdir -p /etc/wireguard/keys; wg genkey | sudo tee /etc/wireguard/keys/server.key | wg pubkey | sudo tee /etc/wireguard/keys/server.key.pub

#setting pubkey variable
PUBKEY=$(cat /etc/wireguard/keys/server.key.pub)
echo "Public Key $PUBKEY"

# setting the privatekey variable
PRIVKEY=$(cat /etc/wireguard/keys/server.key)
echo "Private key is $PRIVKEY"

# Find default interface
# ip -o -4 route show to default | awk '{print $5}'
#eth0
DEFAULT_INTERFACE=$(ip -o -4 route show to default | awk '{print $5}')
echo "Default Interface is $DEFAULT_INTERFACE"
SERVERIP=$(hostname -I | awk '{print $1}')

# Create the wg0.conf file
echo "
[Interface]
Address = 10.0.0.1/24
ListenPort = 51820
PrivateKey = $PRIVKEY
PostUp = iptables -A FORWARD -i %i -j ACCEPT; iptables -t nat -A POSTROUTING -o $DEFAULT_INTERFACE -j MASQUERADE
PostDown = iptables -D FORWARD -i %i -j ACCEPT; iptables -t nat -D POSTROUTING -o $DEFAULT_INTERFACE -j MASQUERADE
SaveConfig = true
" | tee /etc/wireguard/wg0.conf

# Set permissions
chmod 600 /etc/wireguard/wg0.conf /etc/wireguard/keys/server.key

echo "Bring up the interface"

wg-quick up wg0

#should look like this
#[#] ip link add wg0 type wireguard
#[#] wg setconf wg0 /dev/fd/63
#[#] ip -4 address add 10.0.0.1/24 dev wg0
#[#] ip link set mtu 1420 up dev wg0
#[#] iptables -A FORWARD -i wg0 -j ACCEPT; iptables -t nat -A POSTROUTING -o eth0 -j MASQUERADE

# see how it is going
wg show wg0
#interface: wg0
#  public key: z2dUkW5ynTVRi7VQFbUsJoQgRIrZbYZoNW0VIai8kS0=
#  private key: (hidden)
#  listening port: 51820

echo "Enable wireguard on boot up"

systemctl enable wg-quick@wg0
#Created symlink /etc/systemd/system/multi-user.target.wants/wg-quick@wg0.service → /lib/systemd/system/wg-quick@.service.

# check this setting is enabled, and not commented out
#root@au:~# grep net.ipv4.ip_forward /etc/sysctl.conf
#net.ipv4.ip_forward=1

# edit the file with vi or nano or sed
sed -i 's/^#net.ipv4.ip_forward=1/net.ipv4.ip_forward=1/g'  /etc/sysctl.conf
sysctl --system

echo "Server Public Key is"
echo "$PUBKEY"
echo "Server IP address is"
echo  "$SERVERIP"

echo You can use this to help setup a config if you have linux/mac and command line setup
echo export SPUBKEY=$PUBKEY
echo export SADDRESS=$SERVERIP
If you need or run ufw you may need to add the following rules, and also restart services like mysql to listen on those ips
# == add a firewall rule for the wireguard connection
# sudo ufw allow 51820/udp
Rules updated
Rules updated (v6)

# == 22 being your ssh port

# sudo ufw allow 22/tcp
Rules updated
Rules updated (v6)

# sudo ufw enable
Command may disrupt existing ssh connections. Proceed with operation (y|n)? y
Firewall is active and enabled on system startup

# == how is that all looking?

# sudo ufw enable
Command may disrupt existing ssh connections. Proceed with operation (y|n)? y
Firewall is active and enabled on system startup

# sudo ufw status verbose
Status: active
Logging: on (low)
Default: deny (incoming), allow (outgoing), deny (routed)
New profiles: skip

To                         Action      From
--                         ------      ----
51820/udp                  ALLOW IN    Anywhere
22/tcp                     ALLOW IN    Anywhere
51820/udp (v6)             ALLOW IN    Anywhere (v6)
22/tcp (v6)                ALLOW IN    Anywhere (v6)
Grab a client from https://www.wireguard.com/install/
For Linux users, you can use the end of the last script exports and this to setup config
#!/bin/bash
# an easy Linux Client setup
# make sure you have the variables setup from above script , otherwise manually set them
# export SPUBKEY=publickey
# export SADDRESS=serverip
mkdir -p /etc/wireguard/keys; wg genkey | sudo tee /etc/wireguard/keys/server.key | wg pubkey | sudo tee /etc/wireguard/keys/server.key.pub

#setting pubkey variable
PUBKEY=$(cat /etc/wireguard/keys/server.key.pub)
echo "Public Key $PUBKEY"

# setting the variable
PRIVKEY=$(cat /etc/wireguard/keys/server.key)
echo "Private key is $PRIVKEY"


#sudo nano /etc/wireguard/wg0.conf
echo "
[Interface]
PrivateKey = $PRIVKEY
Address = 10.0.0.2/24


[Peer]
PublicKey = ${SPUBKEY}
Endpoint = ${SADDRESS}:51820
AllowedIPs = 0.0.0.0/0
" | tee /etc/wireguard/wg0.conf


echo "Run this on the server"
echo "wg set wg0 peer ${PUBKEY} allowed-ips 10.0.0.2"
Once the above is run, you can start that with wg-quick up wg0
MacOS client setup
On your client you add the interface. It would look something like this (on MacOS):
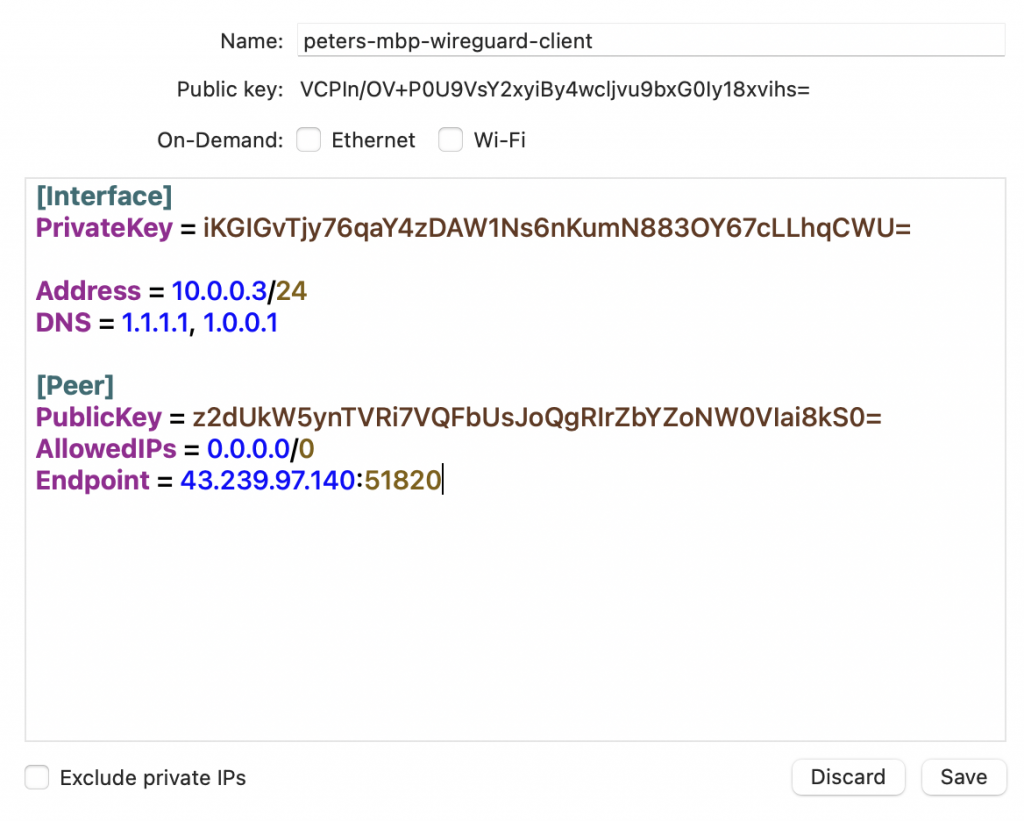
The public key string was created was created by the MacOS client and is shown in the tunnel creation dialog.
On the client save and activate the connection.
Back on the server you tell it to accept the client, now that you have the public key.
root@au:~# sudo wg set wg0 peer VCPIn/OV+P0U9VsY2xyiBy4wcljvu9bxG0Iy18xvihs= allowed-ips 10.0.0.3
On the client then save and activate the connection.
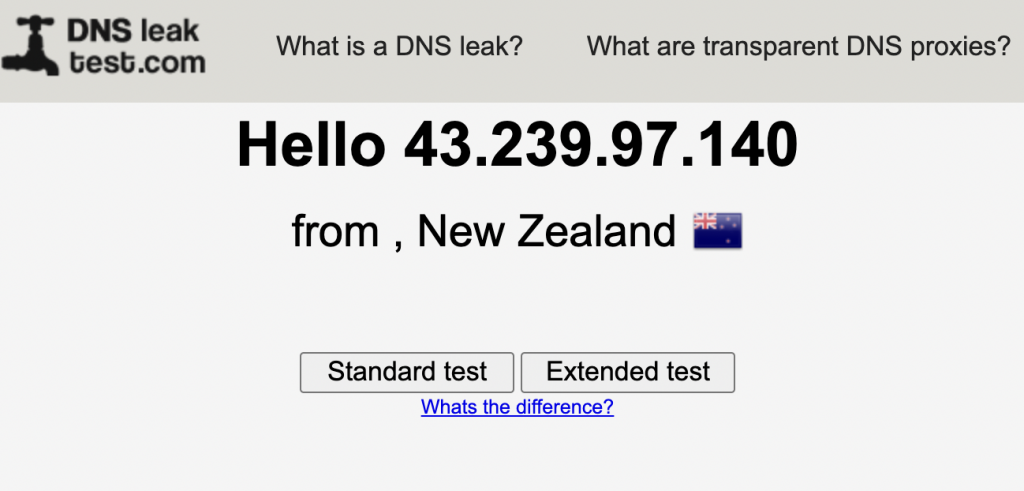
You can now visit https://dnsleaktest.com/ and it should report the IP address as your servers:
Server-side setup of client config
Some clients (for example the MacOS client) generate public/private keys for the client. Other clients (e.g. the iPhone one) may not. So it can be handy to pre-create those on the server.
The following creates a config for a client, called ‘mobile’.
root@au:~# clientname=mobile
root@au:~# clientip=10.0.0.4

# create the client private key, and show the public key.
root@au:~# sudo mkdir -p /etc/wireguard/clients
root@au:~# wg genkey | sudo tee /etc/wireguard/clients/$clientname.key | wg pubkey | sudo tee /etc/wireguard/clients/$clientname.key.pub
U/IT6VKR0aF4emCesUjzj0tAJhQZkdMqVqSQWADmA0o=

echo "
[Interface]
PrivateKey = $(cat /etc/wireguard/clients/$clientname.key)
Address = $clientip/24
DNS = 1.1.1.1, 1.0.0.1

[Peer]
PublicKey = $(cat /etc/wireguard/keys/server.key | wg pubkey)
AllowedIPs = 0.0.0.0/0
Endpoint = $(hostname -I | awk '{print $1}'):51820
" | tee /etc/wireguard/clients/$clientname.conf

[Interface]
PrivateKey = YOkK0aeJiCR5+hXvKE44IsR2y4LhOwnHMJazo/XOVFQ=
Address = 10.0.0.4/24
DNS = 1.1.1.1, 1.0.0.1

[Peer]
PublicKey = z2dUkW5ynTVRi7VQFbUsJoQgRIrZbYZoNW0VIai8kS0=
AllowedIPs = 0.0.0.0/0
Endpoint = 43.239.97.140:51820

# then create a qr code with that config in it:
root@au:~# qrencode -t ansiutf8 < /etc/wireguard/clients/$clientname.conf
█████████████████████████████████████████████████████████████████
█████████████████████████████████████████████████████████████████
████ ▄▄▄▄▄ █ ▀▄▄▄ ▄▄██ ▀ ▄ ▀ ▀█▄█▄▄▀▄█▄▄ █ ███  █▄▄ ██ ▄▄▄▄▄ ████
████ █   █ █ ▀███   ▀▀ ▀▄ █ ▄▄ █▀▄ ▀▄▄▄▄▄█  ▀▄▀ ▄▀▄ ██ █   █ ████
████ █▄▄▄█ █▀█▀ ▀  ▄ ██▄ █▀▄██ ▄▄▄ ▀█ ▀▄ ▄▀ ▀▀ ▀  ▀▄██ █▄▄▄█ ████
████▄▄▄▄▄▄▄█▄█▄▀ ▀▄█▄█▄█▄█▄█ █ █▄█ █▄█▄▀▄█ █ █ █ ▀ ▀▄█▄▄▄▄▄▄▄████
████▄▄▀█  ▄▀▀▄▄▀  ▀ ▄█ ▄██▀▄█▄  ▄  ▀█▀ █  █▄██▄██ █▄▀█▀▄█▄▄ ▄████
████▄  ▄██▄▀▄ ▀▄█▀█▀ ▀ ▄█▄ ▀ ██▄▄ █▄▄▄ ▄████▄▄█▀▀█▄ █▄ █▄▄▄█▀████
████  ▀█ ▄▄▀█▄ █▄▄ █▄▄▀ ▄▀█ ▄▀▀▀█▄ ▄▄ █▄█▄ ▀▀▀  ▄▄█   █ █▄   ████
████▀▀▄█ ▄▄█▀▀▄█▀▀█▀██▄█▄▀  ▄▄▀█ ▀▀█▄ ▄ ▄▄█▄▀▄▄█ ▄▄██▄ ▀ ▀█▀█████
████▀▀ █▀▀▄ ▄█ ▄▀█▄ █▄ ▄ ▄█ ▀ ▄▀█▀ ▄▀ █▀  ▀      ▄██ █▀ ▀▄▀▄▀████
████▀▄▀▀▄█▄▄▀▄▀▄▄▄ ██▄ ▀ ▄▄ ▄▀█  ▀██▀▀█  █▄▄▄ ██▀ ▀▀▀▄▄▄▀█ ▄▀████
████ █ ▄ █▄ ▄█ ▄█▀▀▄█▀ ▄▄█▀▄ ▀ ▀▄▄ ▄ ▀▄▄ ▄▀████▀▄█ ██▄▀ ▀▄▄▀ ████
████▄ ▄█▄ ▄█▄▀ ▄ ▀ ▀ ▄█▀ ▄█▀█▄█ ▀ ▀ █▀▀ ▀██   ▄▄▀█▄ ▄█▄ ██▄██████
████ ▀██▄▄▄█ █ ▀██ █▀█▀  █▀ ▀█ ▀▄ ▄▄ ▄██▀▄  ▄ ▀▀▀█▀█▀▄▀▄█▄█▄ ████
█████▄█  ▄▄▄  ▄▄██▀▀ ▄█▄▀▀█▀▄█ ▄▄▄ ██▀▄ ██▀  █▄██ ██ ▄▄▄ █▄▄█████
██████▀▄ █▄█ ▀█▄█▀▀ █▀ █ ▄▄  ▄ █▄█ ▀▄▀▄▄██ █    █▀▄█ █▄█ ▀▄ ▄████
████▄▄ ▀▄ ▄  ██▄▀ ▀ █  █▀▀▀ ██▄   ▄▀▀ ▀ ▀██ ▀ █▀█▀ ▄ ▄ ▄ ▀█ ▄████
████   █▀▀▄ ███▄▄▀ █▄▄▄▄▀▄▀▄▀ ▄▀█▄██ ▄▀ ▀▄▀██ ▀█ ██▀▀▄▀▀▄█   ████
████ ▀██▄ ▄ ▀▀ ▀  ███▄▀ ▄▄█ ▄▄ ▀█▀▄▀   ▄▀▄  ▄▀ ▀▀▀ ▄▀█ ▄ ▀▀▄▀████
████▀█ ▀█▄▄▀▀▄▄▀▀█ ▀▀▄▄▀ █▀▀▄▀ ▀▀█▀ ▄█ ▀▄▀█▀█▄██  ▄▄▀▄▄ ▄▄ █ ████
████▀█▀▀▄ ▄█ ▄ ██ ▄▄█▄█▄█ ▄▄ ▀█▄██▀████  ▄█▄▀▀▀█ ▄▄▄ █ ▀▀▀▄▄█████
████▄██▄█▀▄▀▀▄▄▄▀ █ ▄ ▄▀▄▄█▀▀█▀▄▀▀ ▀█▀ █▀  ▀▄█ ▄▄██▀▀▀▄█ ██  ████
██████▀  ▄▄▄▀█ ▄▄▄█▀ ▀ ▄▄▄ ▀▄▀▄ █ ▄   ▄▄█▀▀█▄▀▀▀ ▀ █ ▄▀ ▀██▀▄████
████▄███▀▄▄  ▀▀█ █▀▄█▄▀▄█▀█   ▄ ▄▀▄ █ █▀▄█▀ ▀ ▀ █▀█▀▀█ ▀▄██ ▀████
████ ▀ ▀▀▄▄▄▀▀█▄█▄█▀█▄██▄ ▀ ▀▄ ▀▄████ ▄ ██▄ ▄▄ █▄▀█▄▀ ▀▀ ▄▄▀█████
██████████▄█ ▄▄██▀▄▀▄ ▄█▀▄█    ▄▄▄ ▄▀ █▀  █▀▀█ █ ▄▀▀ ▄▄▄ █ ▄▀████
████ ▄▄▄▄▄ █▀▀▀▄██▀ █▄▀  ▄█▀▄  █▄█ ▀█▀█ ▄▄███  ▄▀▀▄  █▄█ ▀▄ ▀████
████ █   █ █▄▀█ ▄▄▀▄█▄ ▄▄▀▄▄   ▄▄▄ █▄▄▀ ▄▄█ █▀▀▀▄▄▀█  ▄  █▀▀▀████
████ █▄▄▄█ █▀ ▀▀██ ▀ ▄█▀  █▀█▀ ▀▄▀█▀█    ▄█▀ ▀▀▀▀█▀▄█  ▀▄▀ ██████
████▄▄▄▄▄▄▄█▄█▄▄█▄█████▄▄█▄███▄▄█▄▄▄▄▄██▄▄▄█▄█▄█▄▄▄█▄▄▄▄▄█▄█▄████
█████████████████████████████████████████████████████████████████
█████████████████████████████████████████████████████████████████

# then add the peer to the VPN

root@au:~# echo  sudo wg set wg0 peer $( cat /etc/wireguard/clients/$clientname.key | wg pubkey) allowed-ips $clientip  | tee /etc/wireguard/clients/$clientname-peer.sh
sudo wg set wg0 peer U/IT6VKR0aF4emCesUjzj0tAJhQZkdMqVqSQWADmA0o= allowed-ips 10.0.0.4
root@au:~# bash /etc/wireguard/clients/$clientname-peer.sh
iPhone setup
Install the wireguard app (from the App Store).
Then add a tunnel via the above QR code. After the tunnel is added, activate it on the iPhone.
Then browse to https://dnsleaktest.com/ on your iPhone and it should load and report the IP address of your VPN server.
Customization
For some Customization, this page puts all your traffic via the VPN, you can change that so you can only connect to some ip ranges via the VPN (eg your own network)
Change the AllowedIPs in your client configuration from 0.0.0.0/24 to something like 10.0.0.0/24*
This will let you connect to your VPS/server on the private IP, but your internet to other things wont go via that.
If you want this sort of setup, then you can likely also drop the forwarding iptables rules, etc.
This is a good option for having mysql open